Temporary Erosion Control While You Await a Retaining Wall
Dealing with erosion while you wait for a retaining wall project? Learn practical, homeowner-friendly temporary fixes to protect your yard and keep soil in place.
Waiting on a Retaining Wall? Here’s How One Homeowner Hit Pause on Erosion
We recently got a call from a homeowner — let’s call him Jason — who sounded pretty stressed. He has a house on a slope, and water coming off the side of his home was washing soil down toward his neighbor’s yard. He already had a contractor lined up to extend an old limestone retaining wall, but like a lot of good hardscape crews, they were booked out for months.
In the meantime, every heavy rain was carving deeper ruts in the yard and carrying dirt under the fence line. The city had sent him a friendly notice about controlling runoff, his neighbor was understandably frustrated, and he just wanted a temporary solution to slow the erosion until the retaining wall project could start.
We see this kind of situation a lot with homeowners: the long-term fix (a new wall, drainage system, or major grading) is scheduled, but the ground is washing away right now. Here’s how we walked Jason through his options, and what you can do at home if you’re in the same boat.
Step One: Understand Where the Water Is Coming From
When we met Jason at his place, the first thing we did was follow the water. In his case, the main culprits were:
- Roof runoff dumping out of a downspout right onto a bare slope
- A narrow strip along the side of the house with compacted soil and no grass
- An older, low limestone wall that ended before the steepest part of the hill
Before you throw any products at the problem, walk your yard during or right after a rainstorm and look for:
- Downspouts that discharge onto bare soil or a slope
- Paths of muddy water cutting through mulch or lawn
- Exposed roots or fresh soil where it used to be covered
- Low spots that collect water and then overflow downhill
Once you know the main flow path, you can choose temporary erosion control that actually works instead of guessing.
Simple Grading Tweaks You Can Do Before the Wall
Jason assumed we’d need heavy equipment, but for a temporary fix we focused on light grading and redirecting water instead of a full regrade.
Here are a few homeowner-friendly options we often recommend:
- Feather low spots: Use a shovel and rake to smooth out small dips that are catching water and then overflowing in one concentrated spot.
- Create a gentle swale: A shallow, grass-lined “ditch” only a few inches deep can guide water along the fence line or house side and away from the eroding area.
- Build a small soil berm: A low, compacted ridge of soil or mulch can nudge water to one side until the permanent wall is built.
For Jason, we lightly reshaped the soil to catch the roof runoff and guide it along a safer path, away from the neighbor’s yard. Nothing we did would interfere with the future retaining wall layout.
Temporary Barriers: Silt Fence, Straw Wattle, and Mulch
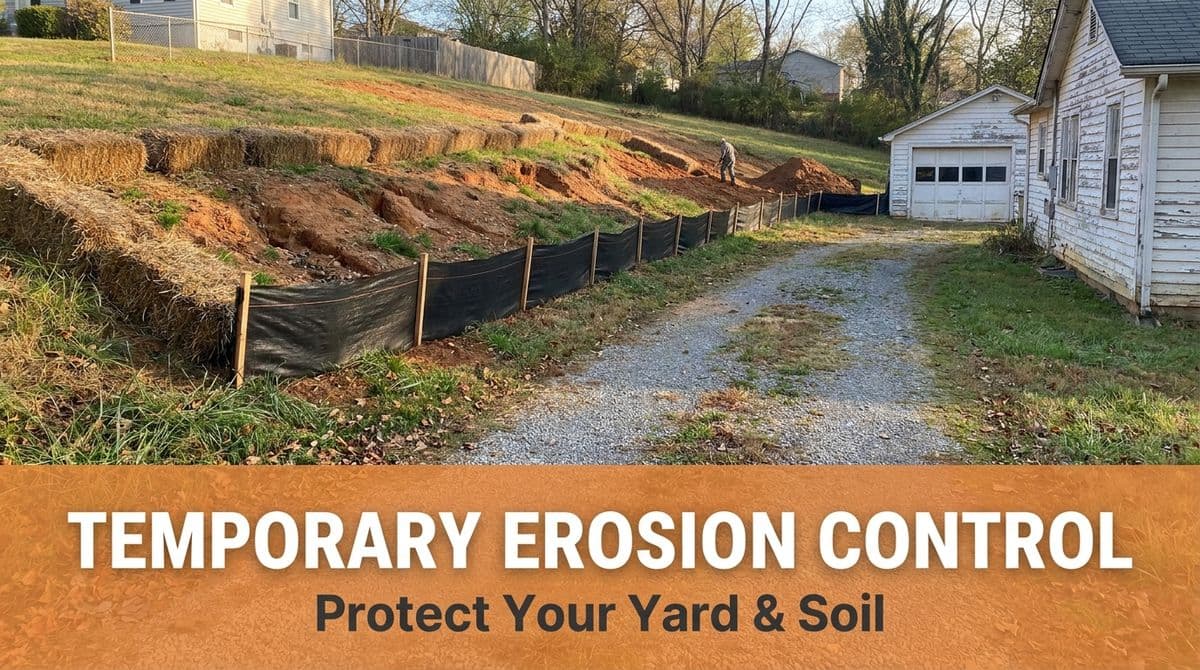
Once you’ve redirected as much water as you can, the next step is to slow it down and capture the soil. On Jason’s slope, we combined a few common temporary controls:
Silt Fence (Good for Property Lines)
Silt fence is that black fabric you often see along construction sites. For a home, it works well near the bottom of a slope or along a neighbor’s fence to catch soil before it leaves your yard.
- Install it in a slight curve, not perfectly straight, so it can hold more sediment.
- Trench the bottom edge 4–6 inches into the ground so water can’t sneak underneath.
- Avoid running it like a dam straight across concentrated flow — it’s meant to filter, not hold back a pond.
Straw Wattles or Straw Bales (Great on Slopes)
For Jason’s bare hill, we added straw wattles (long, straw-filled tubes) laid in shallow trenches along the contour of the slope.
- Place them across the flow, not up and down the hill.
- Stake them securely so they don’t roll during a storm.
- Space them every 6–10 feet vertically, depending on how steep the yard is.
If wattles aren’t available, straw bales can work in a pinch at the base of the slope, though they’re bulkier and less precise.
Mulch and Rock (Protect Bare Soil)
Anywhere water was hitting bare dirt near Jason’s foundation, we added a combination of shredded hardwood mulch and small decorative rock.
- Use 2–3 inches of shredded mulch (it knits together better than bark nuggets).
- Add rock or pavers right under downspouts so water doesn’t crater the mulch.
- Keep mulch a few inches away from siding to avoid moisture issues.
Don’t Forget the Gutters and Downspouts
In Jason’s case, most of the erosion started with one overloaded gutter and a downspout pointed straight at the slope. Fixing that was a big part of the temporary plan.
- Clean your gutters so they don’t overflow down the walls and onto the ground.
- Add downspout extensions (even the basic plastic ones) to carry water 6–10 feet away from the house.
- If possible, aim downspouts toward flatter lawn areas instead of steep banks or property lines.
These are inexpensive weekend projects that can dramatically reduce the amount of water your future retaining wall has to handle.
Planning Around Your Future Retaining Wall
Jason was worried that anything we installed temporarily would be wasted money. We get that. Our goal with temporary erosion control is to work with your future wall, not against it.
A few rules we follow for homeowners waiting on a wall:
- Keep silt fence, wattles, and bales outside the future wall footprint so they’re easy to remove.
- Avoid pouring permanent concrete or building rigid structures where the wall will go.
- Use materials (straw, mulch, fabric) that can be reused, composted, or easily hauled away when construction starts.
When your retaining wall contractor finally shows up, you’ll still have your yard — not a gully — for them to work with.
When to Call in a Pro
If you’re dealing with a small backyard slope, many of these temporary fixes are DIY-friendly. But it’s smart to bring in a professional if:
- Soil is washing toward your house or foundation
- You see signs of a failing existing wall (leaning, cracking, bulging)
- Your neighbor’s yard is being affected and tensions are high
- The city or HOA has sent you a notice about runoff
We helped Jason get a quick, one-day temporary solution in place so he could relax a little while he waited for his limestone retaining wall project to start. If you’re staring at muddy rivulets in your yard and a long wait for your wall contractor, we’re happy to take a look and suggest a plan that protects your property — and your neighbor’s — in the meantime.